Kubernetes is an open-source container orchestration framework which was built upon the learnings of Google. It enables you to run applications using containers in a production ready-cluster. Kubernetes has many moving parts and there are countless ways to configure its pieces - from the various system components, network transport drivers, CLI utilities not to mention applications and workloads.
Note: this blog post was originally written in 2017 for Kubernetes 1.6 and has been updated in 2020 for Kubernetes >=1.16 and a more secure networking configuration
In this blog post we'll install Kubernetes 1.16 on a bare-metal machine with Ubuntu 18.04 in about 10 minutes. At the end you'll be able to start learning how to interact with Kubernetes via its CLI kubectl .
Kubernetes overview:
Above: Kubernetes Components by Julia Evans
I suggest using Equinix Metal (aka Packet) for running through this tutorial which will offer you raw and unadulterated access to bare-metal hosts. You can also run through this on a VM or your own PC if you're running Ubuntu 18.04 as your OS.
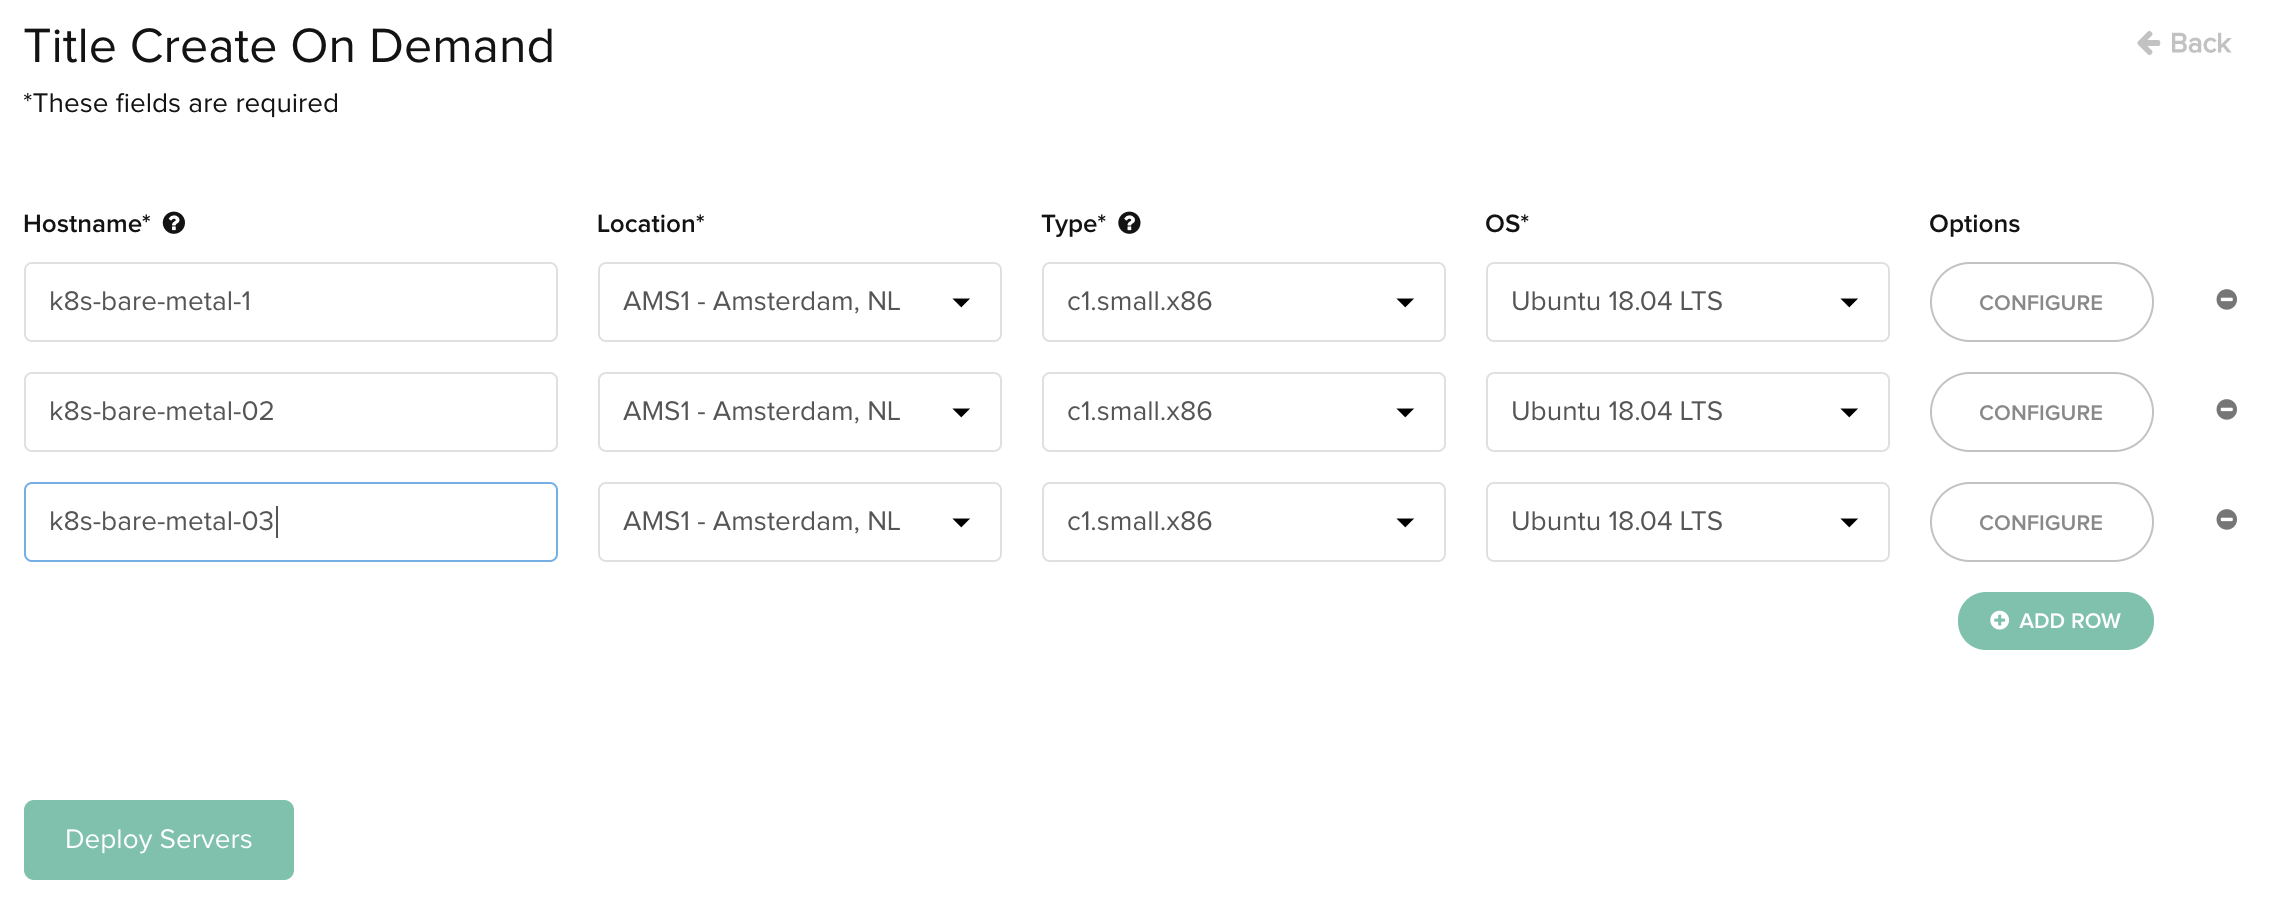
Head over to your Equinix Metal dashboard and create a new project.
I want to see the power and speed of what bare metal can offer so I'm going for the c1.small.x86 which offers 4x Xeon cores @ 3.5 GHz and 32GB RAM per host. There's also a 120GB SSD which we can use for the OS and for any container images we'll need.
The cheapest host is the t1.small.x86 which comes in at around $0.07/hour and offers 4x Atom cores and 8GB RAM. You can view the pricing plans here.
The hosts will take a few minutes to bootstrap, after which you should log into each via ssh and begin installing the same set of packages for Docker and Kubernetes. containerd is now available as an alternative runtime, but is slightly more work to configure.
A known / tested version of Docker must be used with the kubeadm bootstrapper, otherwise we'll potentially encounter unknown behaviours. The apt package repository contains a sufficiently old version for us.
$ sudo apt-get update \ && sudo apt-get install -qy docker.io This command from the Kubernetes documentation adds the package repository where kubeadm , kubectl and the related packages are published on a regular basis.
$ sudo apt-get update \ && sudo apt-get install -y apt-transport-https \ && curl -s https://packages.cloud.google.com/apt/doc/apt-key.gpg | sudo apt-key add - OK $ echo "deb http://apt.kubernetes.io/ kubernetes-xenial main" \ | sudo tee -a /etc/apt/sources.list.d/kubernetes.list \ && sudo apt-get update Now update your packages list with apt-get update .
The kubelet is responsible for scheduling, managing and running containers on your hosts. kubeadm tool is a production-ready convenience utility used to configure the various components that make up a working cluster. The kubernetes-cni package represents the networking components which are not built into Kubernetes directly.
CNI stands for Container Networking Interface which is a spec that defines how network drivers should interact with Kubernetes. CNI network driver processes run using UNIX pipes and are forked for each request.
$ sudo apt-get update \ && sudo apt-get install -yq \ kubelet \ kubeadm \ kubernetes-cni We need to put the Kubernetes packages on hold because if we do not, when a newer version is released and we run apt-get upgrade , we could end-up with an unexpected bump in our Kubernetes version.
sudo apt-mark hold kubelet kubeadm kubectl The Kubernetes maintainers decided that the use of swap memory can lead to unpredictable behaviours and preferred to turn it off, than to contend with any of the side-effects that may come up.
You can check if you have swap enabled by typing in cat /proc/swaps . If you have a swap file or partition enabled then turn it off with swapoff . You can make this permanent by commenting out the swap file in /etc/fstab .
$ cat /proc/swaps Filename Type Size Used Priority /dev/md127 partition 1995772 0 -2 $ sudo swapoff /dev/md127 $ sudo vim /etc/fstab UUID=2358eec8-dda6-4212-9cf6-92f515a1b631 / ext4 errors=remount-ro 0 1 #UUID=b038c1b7-fa7f-4f20-b554-6c2885d73ba5 none swap none 0 0 At this point you should have run the above steps on each of your nodes. These are all common steps.
You only need to run this step on your designated master node, for me that was k8s-bare-metal-1 .
kubeadm aims to create a secure cluster out of the box via mechanisms such as RBAC.
Whilst container orchestrators like Docker Swarm were monolithic and distributed as a single binary, Kubernetes takes a modular and extensible approach. Networking is added only after creating the initial cluster and it's up to the user to pick from one of the dozen networking drivers available.
We will be using Weave net today from Weaveworks. Weave net is easy to install and performs very strongly in benchmarking against similar drivers and can offer features like password-protection and link encryption.
Equinix Metal provides two networks for its machines - the first is a datacenter link which goes between your hosts in a specific region and project and the second faces the public Internet. There is no default firewall - if you want to lock things down you'll have to configure iptables or ufw rules manually.
You can find your private/datacenter IP address through ifconfig :
root@kubeadm:~# ifconfig bond0:0 bond0:0 Link encap:Ethernet HWaddr 0c:c4:7a:e5:48:d4 inet addr:10.80.75.9 Bcast:255.255.255.255 Mask:255.255.255.254 UP BROADCAST RUNNING MASTER MULTICAST MTU:1500 Metric:1 We'll now use the internal IP address to broadcast the Kubernetes API - rather than the Internet-facing address.
You must replace --apiserver-advertise-address with the IP of your master node host.
$ sudo kubeadm init --apiserver-advertise-address=10.80.0.133 --kubernetes-version stable-1.16 You'll get output like this if everything went to plan, if not, then check the steps above.
Your Kubernetes control-plane has initialized successfully! To start using your cluster, you need to run the following as a regular user: mkdir -p $HOME/.kube sudo cp -i /etc/kubernetes/admin.conf $HOME/.kube/config sudo chown $(id -u):$(id -g) $HOME/.kube/config You should now deploy a pod network to the cluster. Run "kubectl apply -f [podnetwork].yaml" with one of the options listed at: https://kubernetes.io/docs/concepts/cluster-administration/addons/ Then you can join any number of worker nodes by running the following on each as root: kubeadm join 10.80.0.133:6443 --token xyzz.abcb494cnfj \ --discovery-token-ca-cert-hash sha256:bf0108833a2cf083b5069e9dff1d502337c0538508975b039cba7d477c278c72 Equinix Metal's Ubuntu installation ships without an unprivileged user-account, so let's add one.
$ sudo useradd k8s -G sudo -m -s /bin/bash $ sudo passwd k8s You can now configure your environment with the instructions at the end of the init message above.
Switch into the new user account and configure the KUBECONFIG
sudo su k8s cd $HOME sudo cp /etc/kubernetes/admin.conf $HOME/ sudo chown $(id -u):$(id -g) $HOME/admin.conf Now try out the KUBECONFIG file:
echo "export KUBECONFIG=$HOME/admin.conf" | tee -a ~/.bashrc source ~/.bashrc Try a kubectl command to see if the master node is now listed, note it will be in a NotReady status for the time being
$ kubectl get node NAME STATUS ROLES AGE VERSION k8s-bare-metal-1 NotReady master 3m32s v1.16.3 We will now apply configuration to the cluster using kubectl and our new KUBECONFIG file. This will enable networking and our master node will become Ready , at that point we'll move onto the other worker hosts.
sudo mkdir -p /var/lib/weave head -c 16 /dev/urandom | shasum -a 256 | cut -d" " -f1 | sudo tee /var/lib/weave/weave-passwd kubectl create secret -n kube-system generic weave-passwd --from-file=/var/lib/weave/weave-passwd Since we are using the default Pod network for host networking, we need to use a different private subnet for Weave net to avoid conflicts. Fortunately the 192.168.0.0/24 space is available for use.
$ kubectl apply -f "https://cloud.weave.works/k8s/net?k8s-version=$(kubectl version | base64 | tr -d '\n')&password-secret=weave-passwd&env.IPALLOC_RANGE=192.168.0.0/24" We've now configured networking for pods.
Kubernetes aims to be a highly available clustering container orchestrator where workloads are spread out over multiple hosts with redundancy. We can however force a single master node to run workloads for development by removing its "taint":
This is only recommended if you are running with a single host, do not run this step if you are adding other hosts into the cluster.
$ kubectl taint nodes --all node-role.kubernetes.io/master- When we ran kubeadm init on the master node, it outputted a token which is valid for 24-hours. We now need to use that to join other hosts.
kubeadm join 10.80.0.133:6443 --token xyzz.abcb494cnfj --discovery-token-ca-cert-hash sha256:bf0108833a2cf083b5069e9dff1d502337c0538508975b039cba7d477c278c72 If you receive an error at this point, it's likely because you forgot a step above. Rememebr that you need to turn off swap memory for every host, not just the master.
Perform the join step on every host.
Move back to the ssh session for the master node where you are logged in as the k8s unprivileged user.
You should see all your nodes in the Ready status now.
$ kubectl get node NAME STATUS ROLES AGE VERSION k8s-bare-metal-02 Ready 113s v1.16.3 k8s-bare-metal-03 Ready 10s v1.16.3 k8s-bare-metal-1 Ready master 15m v1.16.3 Many of the Kubernetes components run as containers on your cluster in a hidden namespace called kube-system . You can see whether they are working like this:
NAME READY STATUS RESTARTS AGE pod/coredns-5644d7b6d9-vwhvb 1/1 Running 0 16m pod/coredns-5644d7b6d9-xgn4b 1/1 Running 0 16m pod/etcd-k8s-bare-metal-1 1/1 Running 0 15m pod/kube-apiserver-k8s-bare-metal-1 1/1 Running 0 15m pod/kube-controller-manager-k8s-bare-metal-1 1/1 Running 0 15m pod/kube-proxy-29j7n 1/1 Running 0 67s pod/kube-proxy-j5bzn 1/1 Running 0 2m50s pod/kube-proxy-p444z 1/1 Running 0 16m pod/kube-scheduler-k8s-bare-metal-1 1/1 Running 0 15m pod/weave-net-bgkwp 2/2 Running 0 67s pod/weave-net-gmr88 2/2 Running 0 2m50s pod/weave-net-td9hm 2/2 Running 0 7m40s NAME TYPE CLUSTER-IP EXTERNAL-IP PORT(S) AGE service/kube-dns ClusterIP 10.96.0.10 53/UDP,53/TCP,9153/TCP 16m NAME DESIRED CURRENT READY UP-TO-DATE AVAILABLE NODE SELECTOR AGE daemonset.apps/kube-proxy 3 3 3 3 3 beta.kubernetes.io/os=linux 16m daemonset.apps/weave-net 3 3 3 3 3 7m40s NAME READY UP-TO-DATE AVAILABLE AGE deployment.apps/coredns 2/2 2 2 16m NAME DESIRED CURRENT READY AGE replicaset.apps/coredns-5644d7b6d9 2 2 2 16m As you can see all of the services are in a state of Running which indicates a healthy cluster. If these components are still being downloaded from the Internet they may appear as not started.
You can also run kubectl get all --all-namespaces . A shortcut for --all-namespaces is -A .
$ kubectl get svc -A NAMESPACE NAME TYPE CLUSTER-IP EXTERNAL-IP PORT(S) AGE default kubernetes ClusterIP 10.96.0.1 443/TCP 17m kube-system kube-dns ClusterIP 10.96.0.10 53/UDP,53/TCP,9153/TCP 17m You can now run a container on your cluster. Kubernetes organises containers into Pods which share a common IP address, are always scheduled on the same node (host) and can share storage volumes.
First check you have no pods (containers) running with:
$ kubectl get pods I wrote a sample application to show developers how to package a Node.js and Express.js microservice. It's called alexellis/expressjs-k8s and you can star or fork it on GitHub.
Let's install it using its helm chart which uses the new Helm 3 release. Helm is used to package Kubernetes manifest YAML files. These YAML files offer a way of packaging an application using a declarative approach.
If you're using MacOS or Linux simply run the below:
curl https://raw.githubusercontent.com/helm/helm/master/scripts/get-helm-3 | bash If you're a Windows user, then install Git Bash and then run the above in a new terminal.
As of Helm 3, each project manages its own repository for charts published either to S3 or GitHub Pages. Let's add the repo for expressjs-k8s and then perform a sync.
# First add the helm repo helm repo add expressjs-k8s https://alexellis.github.io/expressjs-k8s/ # Then run an update helm repo update # And finally install helm install test-app expressjs-k8s/expressjs-k8s You can now view the events from the Kubernetes API and see the container image for the microservice being pulled in from the Internet and scheduled on one of the nodes.
$ kubectl get events --sort-by=.metadata.creationTimestamp -w 11s Normal Scheduled pod/test-app-expressjs-k8s-75667c6649-6hjft Successfully assigned default/test-app-expressjs-k8s-75667c6649-6hjft to k8s-bare-metal-02 11s Normal ScalingReplicaSet deployment/test-app-expressjs-k8s Scaled up replica set test-app-expressjs-k8s-75667c6649 to 1 11s Normal SuccessfulCreate replicaset/test-app-expressjs-k8s-75667c6649 Created pod: test-app-expressjs-k8s-75667c6649-6hjft 10s Normal Pulling pod/test-app-expressjs-k8s-75667c6649-6hjft Pulling image "alexellis2/service:0.3.5" 5s Normal Pulled pod/test-app-expressjs-k8s-75667c6649-6hjft Successfully pulled image "alexellis2/service:0.3.5" 5s Normal Created pod/test-app-expressjs-k8s-75667c6649-6hjft Created container expressjs-k8s 4s Normal Started pod/test-app-expressjs-k8s-75667c6649-6hjft Started container expressjs-k8s # Hit Control + C when done The helm chart outputs some information on how to access the service:
Check the deployment status: kubectl rollout status -n default deploy/test-app-expressjs-k8s Now port-forward the service to test it out: kubectl port-forward -n default svc/test-app-expressjs-k8s 8088:8080 & Try to connect with a browser: http://127.0.0.1:8088 Run the port-forward command and then access the service via curl :
curl http://127.0.0.1:8088 curl http://127.0.0.1:8088/api/links You can find out which node the Pod is running on like this:
$ kubectl get pod -o wide NAME READY STATUS RESTARTS AGE IP NODE test-app-expressjs-k8s-75667c6649-6hjft 1/1 Running 0 83s 192.168.0.193 k8s-bare-metal-02 If you like, you can scale the amount of Pods available, at this point, running the previous command should spread the pods across the two worker nodes that I created.
$ kubectl get deploy NAME READY UP-TO-DATE AVAILABLE AGE test-app-expressjs-k8s 1/1 1 1 2m30s $ kubectl scale deploy/test-app-expressjs-k8s --replicas=2 deployment.apps/test-app-expressjs-k8s scaled Now we have high-availability for our microservice:
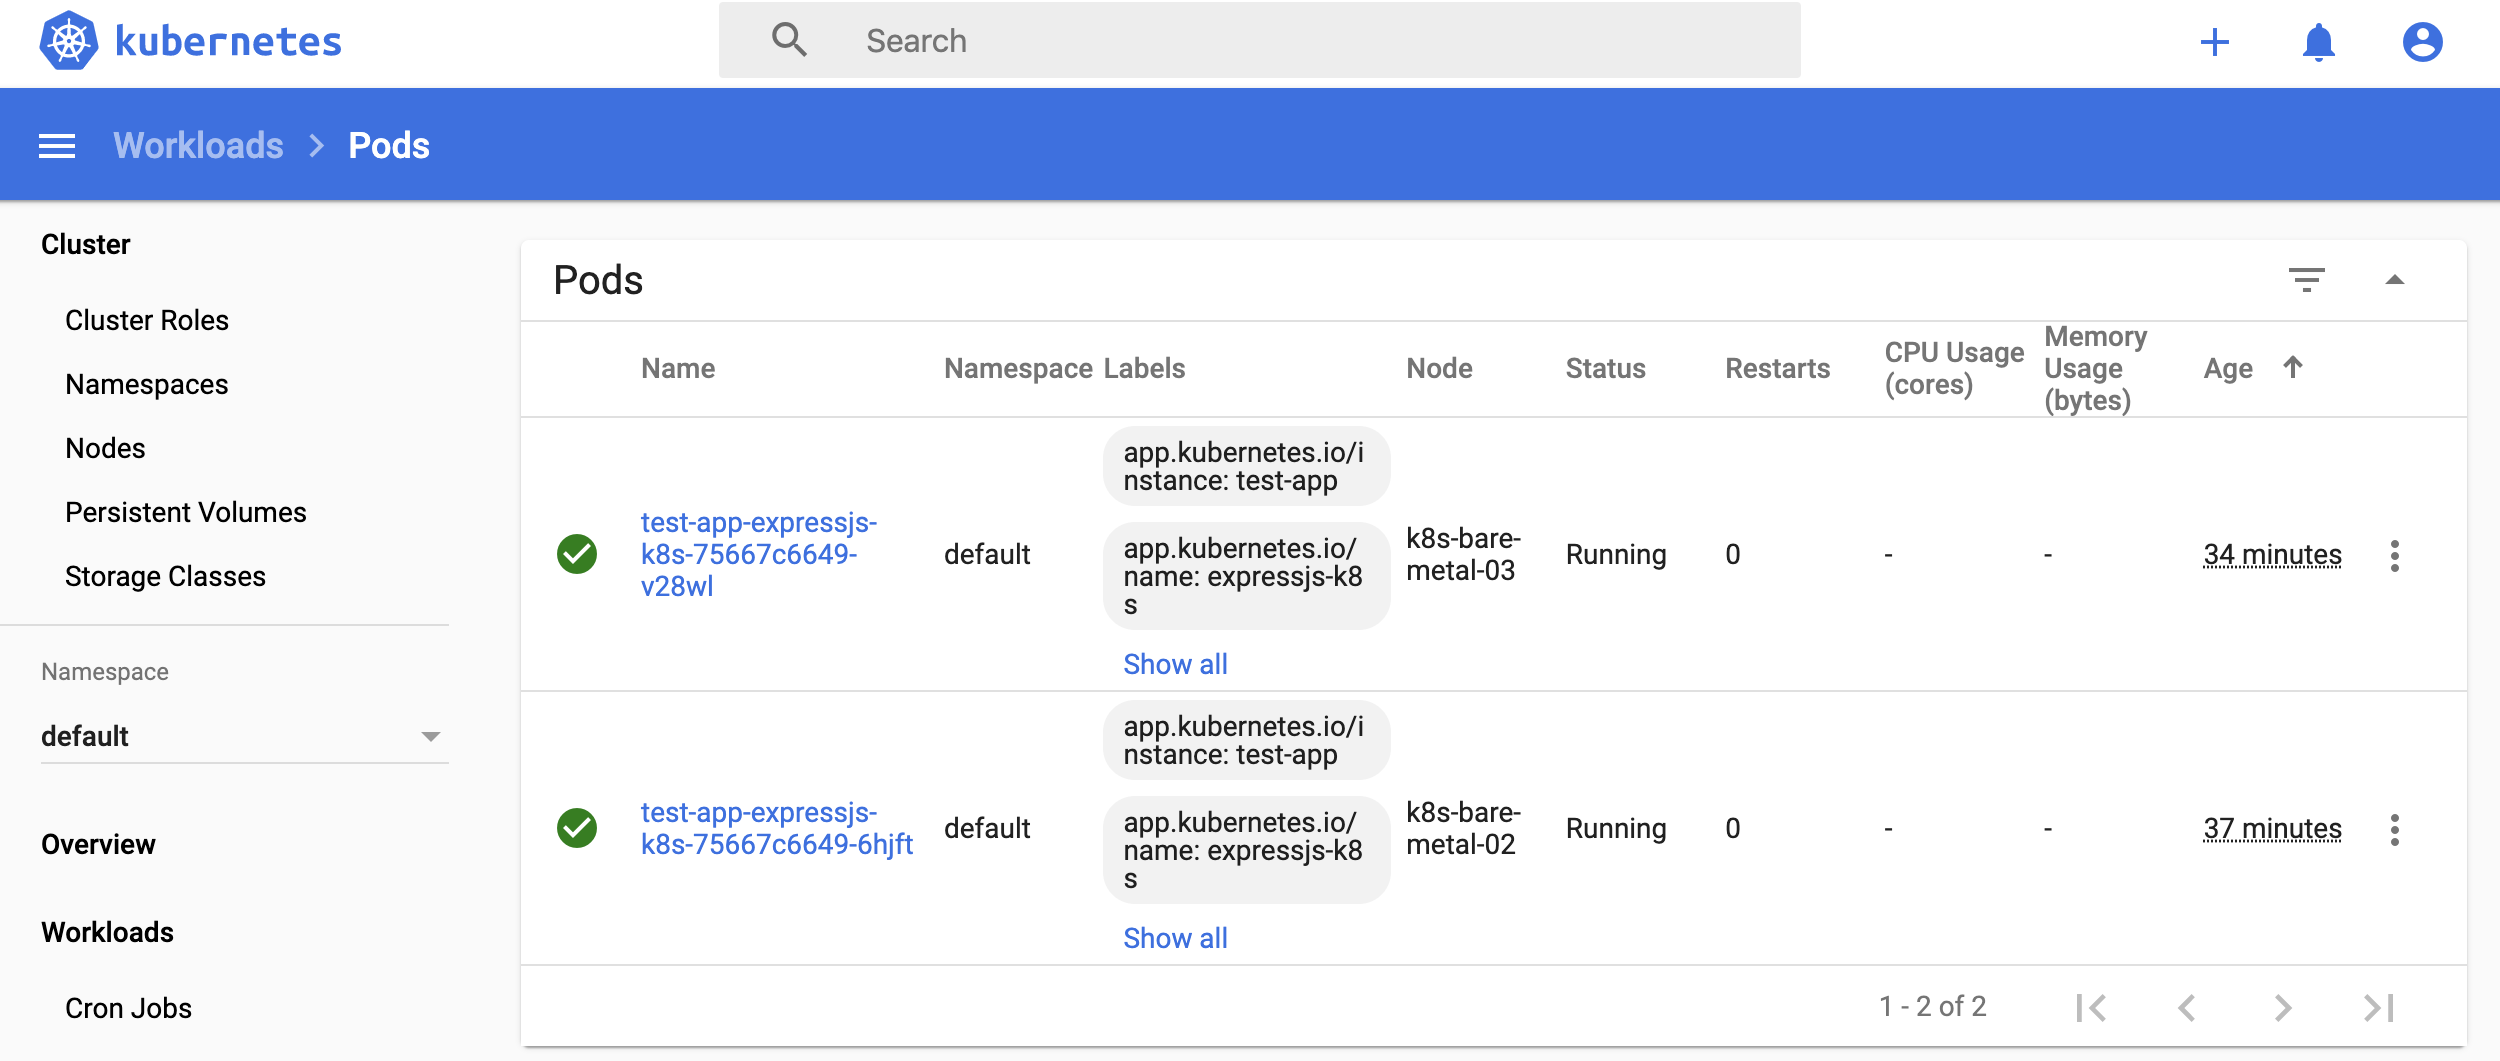
$ kubectl get pod -o wide NAME READY STATUS RESTARTS AGE IP NODE NAME READY STATUS RESTARTS AGE IP NODE test-app-expressjs-k8s-75667c6649-6hjft 1/1 Running 0 3m16s 192.168.0.193 k8s-bare-metal-02 test-app-expressjs-k8s-75667c6649-v28wl 1/1 Running 0 26s 192.168.0.241 k8s-bare-metal-03 The Kubernetes dashboard offers a visual representation of the resources in the cluster and it can be accessed from your local computer too.
When we initialized the clsuter earlier we chose to advertise only on the local network, so we'll need to connect over ssh with port-forwarding to view the dashboard after deploying it.
kubectl apply -f https://raw.githubusercontent.com/kubernetes/dashboard/v2.0.0-beta4/aio/deploy/recommended.yaml Check its status:
$ kubectl get deploy/kubernetes-dashboard -n kubernetes-dashboard NAME READY UP-TO-DATE AVAILABLE AGE kubernetes-dashboard 1/1 1 1 25s Reconnect to the master with a tunnel to our local computer:
export IP="master-node-ip" $ ssh -L 8001:127.0.0.1:8001 root@$IP $ # sudo su k8s $ kubectl proxy & Since the dashboard shows us resources across our whole cluster, we will need to create an admin account for it.
kubectl apply -f - kubectl apply -f - Now we need to find token we can use to log in. Execute following command:
kubectl -n kubernetes-dashboard describe secret $(kubectl -n kubernetes-dashboard get secret | grep admin-user | awk '') Now copy the token and paste it into Enter token field on login screen.
The dashboard can show objects in any namespace, but starts off by presenting the default namepsace where we deployed our microservice earlier using helm.
Here are the two replicas of the Node.js microservice running on our two worker nodes:
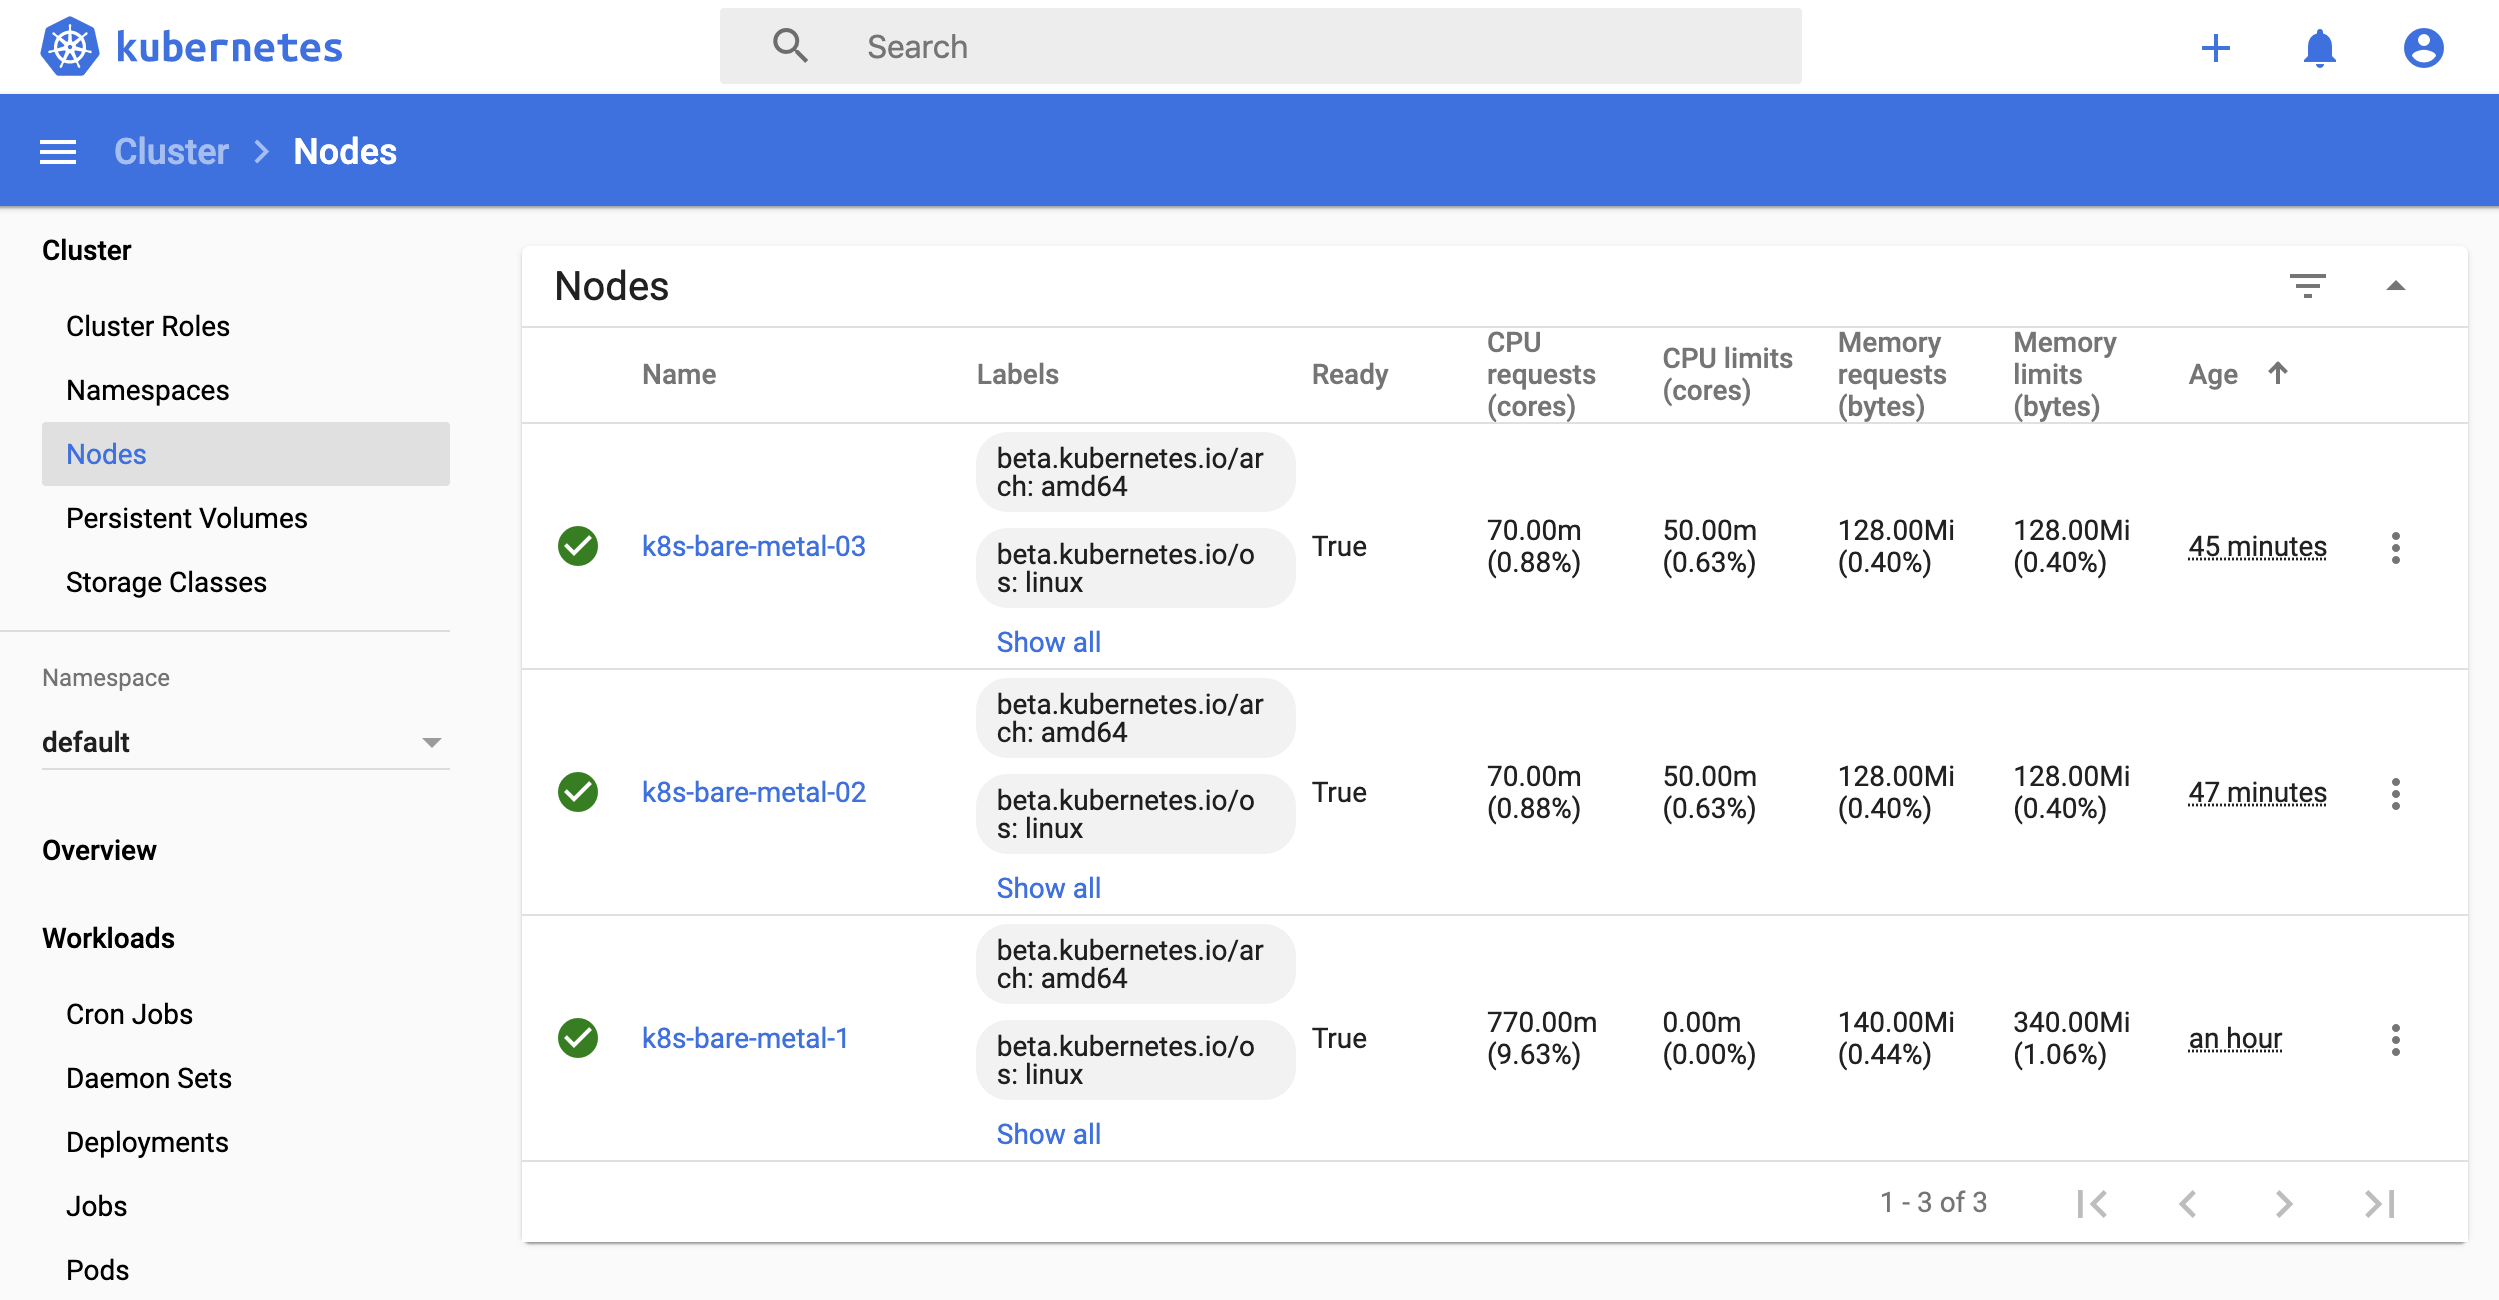
And here we can see our three nodes in the cluster:
For alternatives to the Kubernetes dashboard see also:
You've now created a Kubernetes cluster and run your first microservice in Node.js using helm. From here you can start to learn all the components that make up a cluster and explore tutorials using the kubectl CLI.
Follow me on Twitter @alexellisuk to keep up to date with new content. Feel free to reach out if you have any questions, comments, suggestions.
Email me at alex@openfaas.com to see if I can help you with a project.
Acknowledgements:
Thanks to @mhausenblas, @kubernetesonarm, and Bryan Boreham for feedback on the post and for sharing their tips on setting up a Kubernetes cluster.
Read more posts by this author.
Subscribe to keep in touch. By providing your email, you agree to receive marketing emails from OpenFaaS Ltd
or subscribe via RSS with your favourite RSS reader
Learn how to build and automate serverless functions in JavaScript with an open-source platform that you can run anywhere.
"Everyday Go" is the fast way to learn tools, techniques and patterns from real tools used in production based upon my experience of building and running OpenFaaS at scale.
I headed to the West Midlands in the UK for my first visit to the Fusion meet-up group. I…
In this post we'll look at how you can build and deploy functions quickly via the new FaaS CLI…
Alex Ellis' Blog © 2024 Proudly published with Ghost